Tuesday, March 31, 2015
San Diego EarthFair
Announcement!!! In addition to the Kyocera Solar Expo, Ticklebelly Bungalow will be on display at the San Diego EarthFair on Sunday, April 19th from 10am-5pm. I am so excited about this, that I don't think I'll be able to sleep tonight. Making lists in my head about what needs to be done. Maybe I should just open the file I already have, and prioritize! WAAHOOOO!
Tuesday, March 24, 2015
Staining loft storage lids, trunk finished!, and a wall.
This week started with stain experimentation. I previously saw a blog about homemade wood stain made of vinegar. Thought I'd give it a try. I used vinegar, a tablespoon of hydrogen peroxide, and some leftover copper wiring, hoping to make a light blue green stain. Here's how it went down. 
 I really like how they turned out. Then for the linseed oil, which had to dry for 12-15 hours.
I put the stain together on Monday and used it on Friday/Saturday. I wanted to try a test piece first, but as with many things, I get so excited that I just can't wait.
 Then I realized that I was jumping the gun, and I truly needed to let the stain sit for a few days. By Friday I was chomping at the bit!
First coat on a test piece after the stain had been sitting for 24 hours.
Here is a before/after of the first coat of stain. The top three pieces have stain, the bottom three don't.
I gave the lids four coats of stain... (just turned one over so you can see the difference)
Only a little piece of the frame needed to be stained and I ended up only putting two coats on that. Then the linseed oil on and wait for it to dry. Only need to add the hinges and put them in the loft. Getting closer!
It has been a while since I could declare something officially finished, with no little small thing that still needed to be done. So today is a great day! The steamer trunk is officially finished. I had some cedar left over from the drawers so I put that in the hanging-clothes side, and then I put felt pads on the bottom so it won't scratch the floor when I open and close it. Also, finished taking off the masking tape from the brass rings. DONE!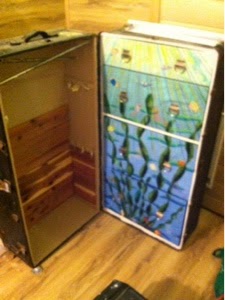

Also, finished putting wall covering on the port side bathroom wall. Might make a painting day tomorrow...just for fun. Then I could also put the faucet handles and shower head in and be finished with that!
Friday, March 20, 2015
Loft storage, the table, and the Laundry Pod
I've started on rebuilding the table into a folding table and it is all in pieces. Lots of sanding and imagining how I want it to look. I glued one side of the top back together.


I also started the sleeping loft storage. Lots more sanding, but I think having that little bit of storage space will be nice for things that don't get used a lot, like Christmas decorations. It will also create a flat surface for my cocoa mug. :)
The table...
I've started on rebuilding the table into a folding table and it is all in pieces. Lots of sanding and imagining how I want it to look. I glued one side of the top back together. Now I'm putting it back together with hinges and a new piece in the middle so it can fold up. Here it is so far.
The Laundry Pod
Tried it out with a few pieces of clothing. Will need to adjust the amount of soap, but it seems to work well so far. A bit of experimentation will be forthcoming. This will live under the kitchen sink and serve as my dirty laundry basket too.
Sunday, March 15, 2015
Kitchen plumbing
Just a quick reminder that the t-shirt fundraiser is still happening...click here to order or make a donation. I'll be taking t-shirt orders until March 22 (next Sunday). The donation option will be open until April 17th, the day before we leave. Thanks to those who have ordered a shirt or have donated toward this first big adventure!
The best way to finish something is to begin. This I know for a fact. Started the kitchen plumbing and now it is finished.
The best way to finish something is to begin. This I know for a fact. Started the kitchen plumbing and now it is finished.
Started...


Finished.
Saturday's job was to test the water input for leaks before putting in the tub...first impression was epic fail, but on re-evaluation the shower connections were drip-free as was the kitchen cold water. The kitchen hot leaked, but just needed to be tightened a little. The epic fail section was the hot water heater connections. Frankly I'm not too surprised. I decided to add a shut-off valve to the water input on the water heater. I will eventually have a shut-off valve on the water coming into the house, but as yet don't.
After cleaning up the water mess, adding the shut-off valve, and tightening everything that needed tightening, I turned on the water again. Behold, the water heater connections are still not cooperating. So back to the drawing board there. My sharkbite connectors don't thread very far despite being the correct size, so I used the connectors that came with the heater, but they don't connect to the piping well. So there you are. Everything else was dry. Put the sharkbites on and tried again. Now the pipe connections don't leak but the fittings do. I think I'll give up for today on that one and do something else.
Since the shower connections all hold water, I began putting up the wall covering. I've ordered some water leak alarms that I'm going to put in the wall, so I'm not going to finish it all up until those come mid-week this week. Looking good so far.
With shower handles for effect.
Monday, March 9, 2015
Blinds and more blinds
While on my trip to IKEA a couple of weekends ago, I discovered some table runners that I thought would make good blinds. So I bought them. And here, two weeks later, we have some blinds to put in all the windows. We have tan for the big windows and white for the kitchen. Hanging the kitchen blinds will be more of a challenge than the living room windows. So here's what they look like...


Kitchen blinds (not yet hung in the kitchen)
Used buttons on the pull strings
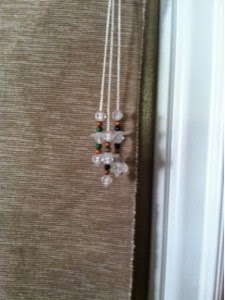
Living room blinds
Used beads on the pull strings.
Hung in the living room
I also got some permanent lighting put up. I wanted most of my lighting to be run by smaller batteries like AA's (rechargeable). So I found some LED strip lights that I've attached to battery packs. I got the ones for the storage loft put up. There is a switch just above the door, so the lights can be turned on as you walk in. Still making some decisions about the ones for the kitchen.
Thursday, March 5, 2015
T-shirt fundraiser to send Ticklebelly Bungalow to San Diego!
Ticklebelly Bungalow is going to the Kyocera Solar Expo 2015 on Tuesday April 21st in San Diego, California! To get there I need to rent a pick-em-up truck (unless someone would let me borrow theirs for a few days). To help with the cost, I've made up some lovely Ticklebelly Bungalow t-shirts for you to purchase. Just choose a style (women's fitted or men's regular), and a color (white shirt or blue shirt) and place your order. Children's sizes are also available in white or blue. All proceeds go toward truck rental and gas to get there and back. AND you get to wear a fantastic shirt! Click here to place your order between now and March 22nd. Shirts will ship beginning April 1st. I'll be wearing one at the Expo! If you don't need a shirt, but would like to help the Bungalow get to San Diego, there is also an option to make a donation. Add the $1 donation to your cart and then update the quantity to reflect your desired donation amount. Thank you for helping make this first adventure for the Bungalow possible!


Shirts look like this:
Women's fitted blue
Men's regular white
Subscribe to:
Posts (Atom)